Painting Service

Den of Imagination offers a variety of services including single display miniature pieces as well as an army painting service.

Blood Angels

GIGANTIC BLOOD ANGELS ARMY WITH EPIC FREEHANDS!

Hierophant showcase!

From our painting service - our level 6 (Legendary) Bio Titan! Paulina did wonderful job...

THE TEMPLE

Now this is something special fresh and new. Fist your eye on The Walking Temple.

RED GLOW NECRONS

Make it glow. oh yeah take a look at this eye candy.

Monday, July 30, 2012

The Third Eye of Tzeentch is open

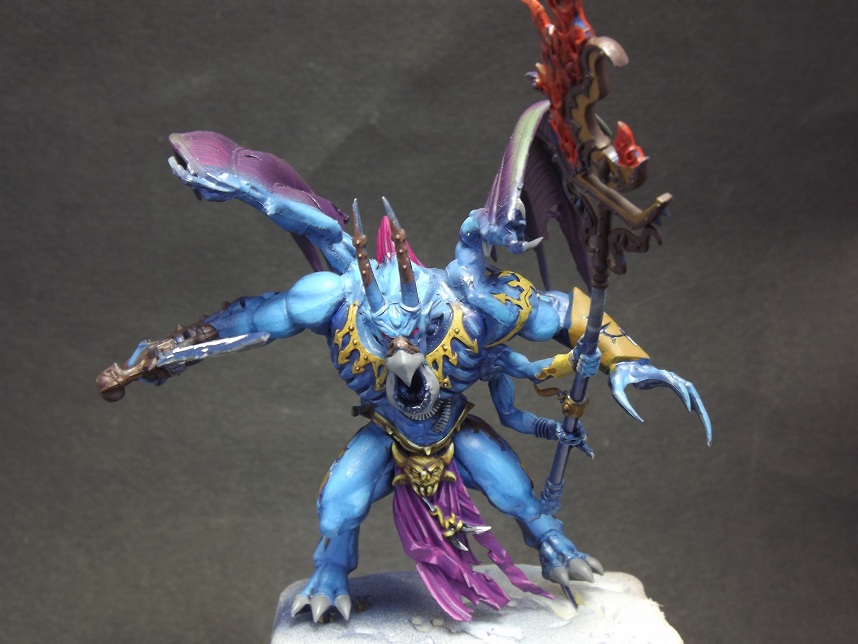
     The Third Eye is open and the model is finished. It was a fun model to paint indeed. A refreshing take when it comes to color palette. I never used so much blues and purpples in any model. This guy gave me an opportunity to train my NMM's  I think that I am getting better at it. It's not a technique that I use often. I'm  particularly happy with the staff paint wise and as for the whole modelling part I think that the scenery is quite well executed. The pillar from MINI MONSTER'S helped me a great deal in constructing the Temple of Tzeentch that is being summoned by the Daemon Prince. The inspiration behind this Checker boarded floor temple is the symbolism of twin dimensions crossing each other forming a gate-way between two worlds, through which the daemon can pass in to the mortal realm.
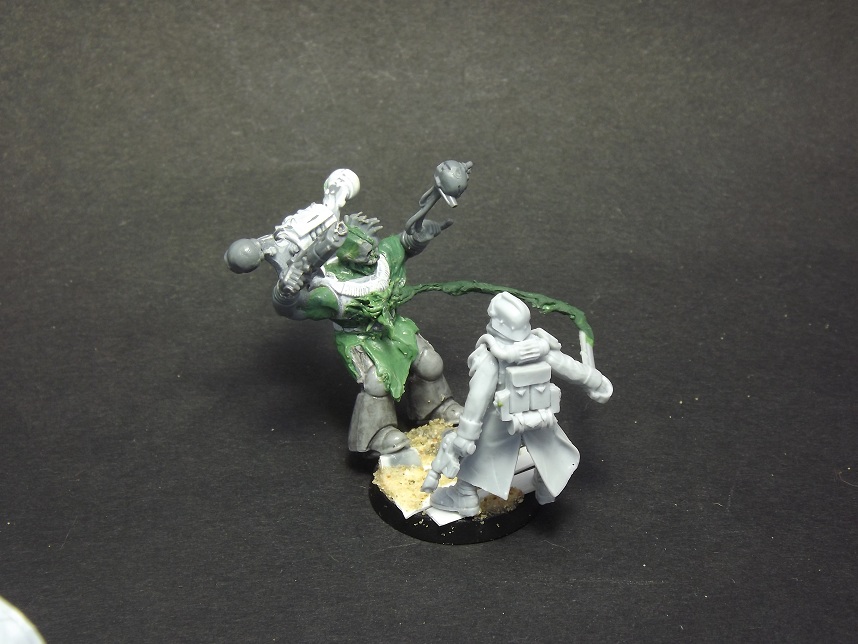
     The Ultra Marine with all his courage assaulted the Daemon but he didn't survive the Daemonic Gaze and the change was inflicted on him sealing his fate.


If you like what I do, You can follow me on Facebook to receive updates of new articles on the blog.
Cheers,
Brovatar.

Saturday, July 28, 2012

Checker Board, Checker Board

 I started to paint up the Daemon Prince. I'm still waiting for a column to finish up the base. Still much to do but I'm keen on finishing him up fast so that's ok :) I would like to hear from you guys what you think about the color scheme, is it Tzeentch enough ?


Cheers,
Brovatar.

Friday, July 27, 2012

Dry Earth Bases Tutorial

     This post is going to be a semi product review with a cool tutorial that I have prepared for you guys. Lately I came across a product in my local art supply shop. Facetten-Lack Croco Crackling Colour by Viva Decor .  It's a "structural paint", it means that it takes a certain structures after it dries. In case of this one the structure is an imitation of a cracked ground surface. The cracks depend on how thick the layer of the paint is but Ill get to that later. It comes in many colors but as a small scale mini painter I prefer it white because I'm going to paint it anyway.
 I found some inspiration photos on the web to look at some real natural dried earth and I started working on my 1st base.


     First thing you need to do, and this is really important, is to prepare your surface on which you will be applying the structural paint. On the paint there is an instruction to prime the sub-surface with a Viva decor primer to make it stick but I found out that it's enough to apply some sand on your base and it will do just fine. At this stage it's important to let the pva glue dry completely before applying our crackling paint. It's a cool idea to glue some bits and rocks for decorative purpose on the base at this moment but you can do it later. Next time I'll probably put some skulls and bones on the base when I'll be doing it.

     The base has dried, now we can apply the structural paint. You can go many ways with this. The paint is quite thick, to achieve tiny crackles you should apply a really thin coat of paint but if you want some big cracks you will need to put a nice thick layer. I went with an irregular shape to make it look more natural.


     This is how the dried paint will look like. As you can see there are smaller cracks at the fringe of the base where there was a much smaller coat of paint, and there are big cracks closer to the center where the paint was the thickest.


     After we have our base all dried and crackled, it's time to paint it up. At this point, your imagination is the limit. The drybrush technique will most definitely come in handy and the washes can play a part as well. I airbrushed the whole base dark brown focusing on the gaps to be sure that they are nicely painted to represent the shadow. I think that my paint choices weren't the best here, there's room to experiment you can't go wrong with gray tones on this one.

     Let's sum up. This technique will definitely find its place among some Tomb Kings, Necron Armies and I think it would fit nicely among Thousand Suns. However we don't need to stop there, it can also be useful to represent some wasteland in a diorama. In the end, it's another cool way to help us express ourselves in this hobby. Hope you find this tutorial useful. If you like it, remember to follow me on Facebook to receive updates of new articles on the blog. I leave you with some more insirational photos, go crazy and make something cool.
Brovatar.


Thursday, July 26, 2012

Hold your ground!

     I'm proud to present some traitorous scum death brought to you by The Death Korps of Krieg. I finished those guys. My personal favorite is the Flag bearer stabbing the surrendering dude. And of course you can't unnotice the cool blood stripe from the CSM that has "awesomeness" written all over it. Aaron asked me if I could replace the las gun with a Plasma gun and make the victim shot by it. So I did and I like it better that way. I'm quite happy with the end result, can't wait to see them painted.


Cya,
Brovatar.

Wednesday, July 25, 2012

My first Sculpture WIP

     Here is the beginning of my first miniature that I want to sculpt. I did a lot of sculpting in my life but never did I make a full model by myself it always was some conversion work. I hope that I will manage to make it look acceptable. It's going to be a Vampiric creature don't know if I want to make it with wings or not. Haven't decided yet. What do you think?


     If you like what I do You can show some support and fallow me on Facebook I really appreciate it.

Have a nice Day,
Brovatar.

Tuesday, July 24, 2012

Slice and Dice

     Some work in progress photos of the Death Korps of Krieg guys. I made a trail of blood following the path of the blade to make it look like he's slicing through the Chaos Space Marine. As the victim falls down from the penetrating blow, he desperately grabs a servo skull. I still need to do much green stuffing on them but they are starting to look cool already if you ask me.


Cheers,
Brovatar.

Friday, July 20, 2012

Take no prisoners

     Death Korps of Krieg guys finally reached my door. Waiting no time at all I jumped straight to converting. I present to you my first fruit of a days work. This guy is almost finished, just needs some tweaking here and there. The hardest part about this one was pin pointing both hands and the chest of the victim to the banner. Looking at this model brings to me an urge to stab some one with a flag pole ;p. The main goal with this commission is to give 3 of the squad guys more dynamic poses by bringing them to combat with some traitor guardsmen. I think that in this one I achieved just that. The next one will be the sergeant slicing through a Chaos Space Marines chest. Stay tuned.


Cheers,
Brovatar

Tuesday, July 17, 2012

Purple shifting sands.

     I've been airbrushing today my DPoT and his base. Love my new Valejo air paints, they make airbrushing so easy. I'm going to start from the base first. For the tailes I was thinking of painting them golden or a shade of blue but I'm going to go with checkerboard style. I think that they will contrast well with the DP. I sculpted a symbol of Tzeentch and an eye on two of the tails to give them a cool feature.


"The only constant in the universe is change"
Cheers,
Brovatar.

Monday, July 16, 2012

Salamanders on Display

     Salamanders didn't go that easily on eBay so I thought that they need better photos. So here's my new Salamander army gallery. Enjoy.


It's the third time.. <keeping my fingers crossed >.
Brovatar.