Hi guys! I thought I'd show you how to paint raven guard shoulder freehand in a easy way. You can use this method when painting the whole squad/army (as I did ). The important part here is , in the beginning steps, not to paint the whole picture on each marine but to separate each step and paint it onto the whole group before moving to another step. This way you can compare positioning of each part and make all the freehands look similar, if not the same.
Also remember that layers of paint you'll apply have to be thin so it won't disturb the smoothness of the shoulder pad.
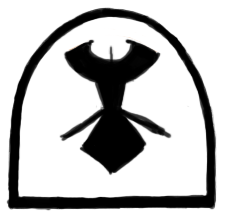
step 1. First you have to imagine the raven on the shoulder pad and think how to position it. It's important to leave some space above and beneath the logo. The picture shows gray imaginary arch which sets the top edge of the wings. Using black paint make four symetrical dots determining the angle, lenght and edges of the top of the wings line. Paint vertical line through the middle of the shoulderpad, ending where the tail's tip should be and mark the level of bird's waist. Paint the arch between two highest dots.
step 2. Connect the lines and paint the bottom arch marking the line where wing feathers start to separate and fillitwith black.
step 3. Add the shape of bird's trapezoid 'torso'. Paint leg lines a little thicker so you can cut the final shape out of it later, legs should go as the step 3 gray shape but lower. Add the shape of tail and fill it with paint as well as torso.
step 4. Paint two separate lines on each side of bird, one on inside longer and parallel to leg lines, third line going a little up.
step 5. Paint feather lines starting from the outer side. The middle line of each wing here starts from the end point of longer line from step 4. Keep the lines somehow parralel to each other leaving even spaces in between.
step 6. Add the head. Now we get a bit closer to the final look.
step 7. Add the nib. If the line gets too thick, you can fix that later. Now time for white paint. The orange shape shows how and where your should cover the freehand with white. Paint straight white lines making the feathers tips even and cut the raven with one line connecting tail and outer feather of wings.
step 8. More white corrections- shaping the legs, tail and head.
step 9. Add an eye and here we have the final form - looks nice, clean and graphic. Add some more black if cutting with white went too far :P
I hope you'll find it helpful :) In this tutorial I wanted to show how I separate each steps but if you feel like it, you can mix the sequence of steps a little - for example split the process into more easy steps like outline of shapes first and filling it with color later.
When starting to work with those models I tried to pretty much reseble their 'cover' look. Well, it doesn't really apply to Ezekiel though, I made some simple changes to his color scheme to make him match more.
The color bases for amours and drapes were made with airbrush. I'm really fond of how blue librarians amours look with both lined and airbrushed highlights. Probably Ezekiel and the old guy are one of my most flashy paintjobs ever :P Colors are saturated and you can see many contrasts there, I also used many very bright paints for lights. Additionally power swords sure are flashy, I heard they were the reason for this commission ;P
This project got quite a lot of spare time for freehands so I put an effort to use it well :) I tried to add something ornamental to every cape though Belial was luckier than others getting half of his clothes decorated. There must be something in those velvet greens.
I had some hard time trying to make the bases look like ancient mosaic. I'm still not sure if the effect is close to what I imagined at first but it so happened that I accidentally did some nice looking marble arount the mosaic parts. Oh well :)