


step 1. First you have to imagine the raven on the shoulder pad and think how to position it. It's important to leave some space above and beneath the logo. The picture shows gray imaginary arch which sets the top edge of the wings. Using black paint make four symetrical dots determining the angle, lenght and edges of the top of the wings line. Paint vertical line through the middle of the shoulderpad, ending where the tail's tip should be and mark the level of bird's waist. Paint the arch between two highest dots.


step 5. Paint feather lines starting from the outer side. The middle line of each wing here starts from the end point of longer line from step 4. Keep the lines somehow parralel to each other leaving even spaces in between.

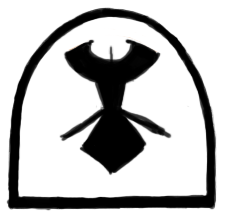
step 6. Add the head. Now we get a bit closer to the final look.

step 7. Add the nib. If the line gets too thick, you can fix that later. Now time for white paint. The orange shape shows how and where your should cover the freehand with white. Paint straight white lines making the feathers tips even and cut the raven with one line connecting tail and outer feather of wings.


I hope you'll find it helpful :) In this tutorial I wanted to show how I separate each steps but if you feel like it, you can mix the sequence of steps a little - for example split the process into more easy steps like outline of shapes first and filling it with color later.

Good luck and have fun!
Paulina


0 comments:
Post a Comment